Modpacks (mostly) built using SKCraft Launcher and a small collection of Perl and shell scripts.
Modpacks at Polytopia

Michael recommends new users read this page at least once. This timestamp (and hopefully this page) last updated: 20-Dec-2022
Contents
Installation
First, download the bootstrap jar and put it somewhere sensible. You will be launching this whenever you play the game; you may also wish to create a shortcut icon or whatever for it.
Run the bootstrap jar. You have Java installed, right? You should be hopefully then be presented with a window showing available modpacks (on the left column) and some news (on the right).
As of writing (14-Apr-2024) the current version of the launcher is polytopia7.20240410. If you see an older version in the launcher titlebar, then something has gone awry with the bootstrap's update process.
Java
You need to have a Java runtime installed? Which one? Well. Java 8 is a good choice for Minecraft versions before 1.17, though Java 9 or 11 works for some versions. For Minecraft 1.17 and newer, you'll want Java 17. Make sure it is the 64 bit version, or you will probably have a bad time. Windows users may wish to consider getting their Java from Adoptium.
Launcher Troubleshooting
In case of trouble (out of date launcher, errors while installing or launching modpacks, Mojang/Microsoft authentication problems, etc) there are a couple of things to try:
- Nuke the launcher jar
Somewhere in your machine's home directory, there is a folder namedPolytopia Minecraft Launcher(or, under unix, see ~/.polytopia-mclauncher). In there is a subfolder named launchers/, containing one or more .jar files. Nuke these files and re-run the bootstrap. - Nuke the bootstrap jar
Just delete the bootstrap jar and download a fresh version.
Launcher Options
There are a handful of global options. The vast majority of you will not need to do more than set Maximum Memory (or at least confirm that it's already a sensible value) before moving onto modpack-specific settings.
Maximum memory
Under Options there are some settings. The important one is Maximum memory. The default value is three quarters of your RAM, up to a limit of 6GB. If your machine has 8GB RAM (or less!), then things are probably going to be a bit tight, depending on which modpack you're playing, and how many memory-hungry modpack-specific settings (which you will encounter later) you have enabled. Consider disabling Fancy Graphics (or at the very least don't use shaderpacks), avoid enabling fancy resourcepacks, reduce draw distance, close your web browser, etc.
If you set this value too low, then Minecraft will likely run out of memory, either during startup, or at certain times such as connecting to a server, adding a resource pack or changing shaderpacks. Symptoms usually include Minecraft suddenly running really slowly, yet using all CPUs on all cores. In severe cases Minecraft will suddenly quit. As a guide, Vanilla (unmodded) Minecraft will want at least 1GB, and many full-featured modpacks can demand something in the 4 to 6 GB range. Enabling shaders will probably add up to 1GB to this.
If you set this value to and unreasonably high value, then your entire computer will run out of memory and/or swap. 8GB users may need to experiment to find the right balance that allows them to play the game without problems.
JVM arguments
Those with an optimisation fetish may wish to look here for inspiration. For a long time, I used the following options with OpenJDK 8:
-XX:+UseConcMarkSweepGC -XX:+CMSIncrementalMode -XX:-UseAdaptiveSizePolicy -client -d64Note that Java 11 will prefer a different set of options, due to development of different GC algorithms.
Launching a modpack
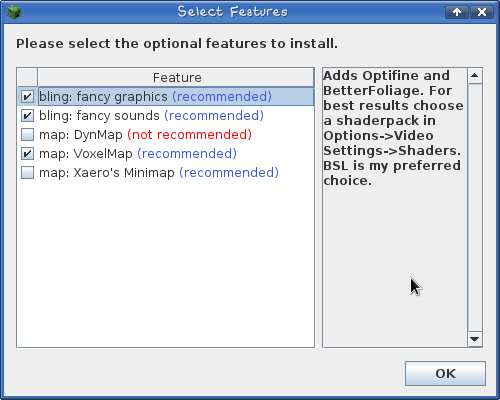
Choose a modpack and hit the Launch button. You'll be asked to log into your Mojang account, after which you'll likely (unless it's a very simple modpack) be presented with a dialog to (de)select some optional features. Ideally you'd enable all non-mutually-exclusive options, but low memory users may need to instead disable options in order to make the game fit onto their machine.
Feature Selection
The available optional features will usually vary from modpack to modpack, but common themes include:
- Fancy graphics: enabling this adds visual bling to the game, mostly in the form of OptiFine. This can vastly improve the look of the game. Unless you don't have much RAM, or your video card is a potato, you probably want to enable this.
- Fancy sounds: this usually enables Dynamic Surroundings, which adds biome sounds, footprint sounds, reverb, etc.
- JourneyMap/Voxelmap/Xaero's Minimap: these provide a top-down map so that you can see where you are in the world. Usually it does not make sense to enable more than one of these at a time.
There will likely be other options, but you can leave them at their defaults until you make your own mind up.
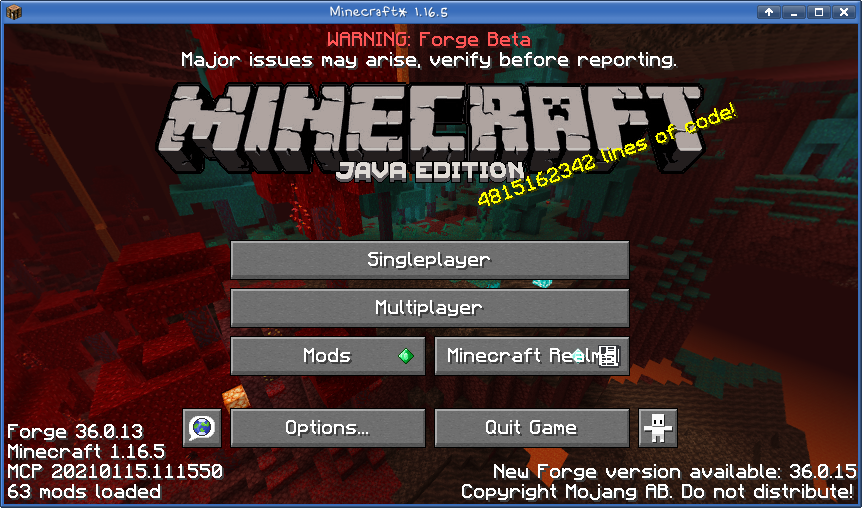
Game startup
After you've selected optional features, the game will start up. This can potentially take quite a bit longer than unmodified Minecraft. Watch the progress bar(s), and/or go get a drink.
You will hopefully (eventually) be presented with the game's main menu.
The first time you run a particular modpack, you're probably going to want to visit the Options, where you will be met with a bewildering array of choices. Some of the more important/useful ones:
Controls
It is inevitable that there will be multiple mods that chose the same key binding for their actions. You may not need to change anything straight away, but expect to need to keep returning here to enable (or disable) specific keybindings. Key bindings for Veinminer and whichever map mod you're using will likely be the first you change.
In Mouse Settings, you'll want to enable Invert Mouse, as God intended.
Resource Packs
Consider enabling some/all of the packs listed here, or use your own if you wish. I'm a fan of 32x resource packs (especially the Faithful ones) myself.
Video Settings
I won't attempt to cover everything here in any depth, but some of the settings you might want to fiddle with:
- Shaders (when Fancy Graphics enabled). This makes a significant improvement to the appearance of the game, adding varying degrees of realism to the lighting and shadows. If you are cutting things fine in terms of RAM, then this is where you'll find out just how fine you've cut it, by Java (or your PC) (not) running out of memory. Shaders will also usually give your video card a workout. Expect to hear from your GPU fan(s). In the bottom right hand corner, you'll find shader-specific options, assuming the author has provide settings for you to change.
- GUI Scale: one day I'll make it default to 2/Normal. In the meantime, menu text will probably be too big.
Mod-specific settings
The Mods button on the game's title screen lets you see the installed mods, and (maybe) let you modify their configuration. A very incomplete list of things you may want to fiddle with:
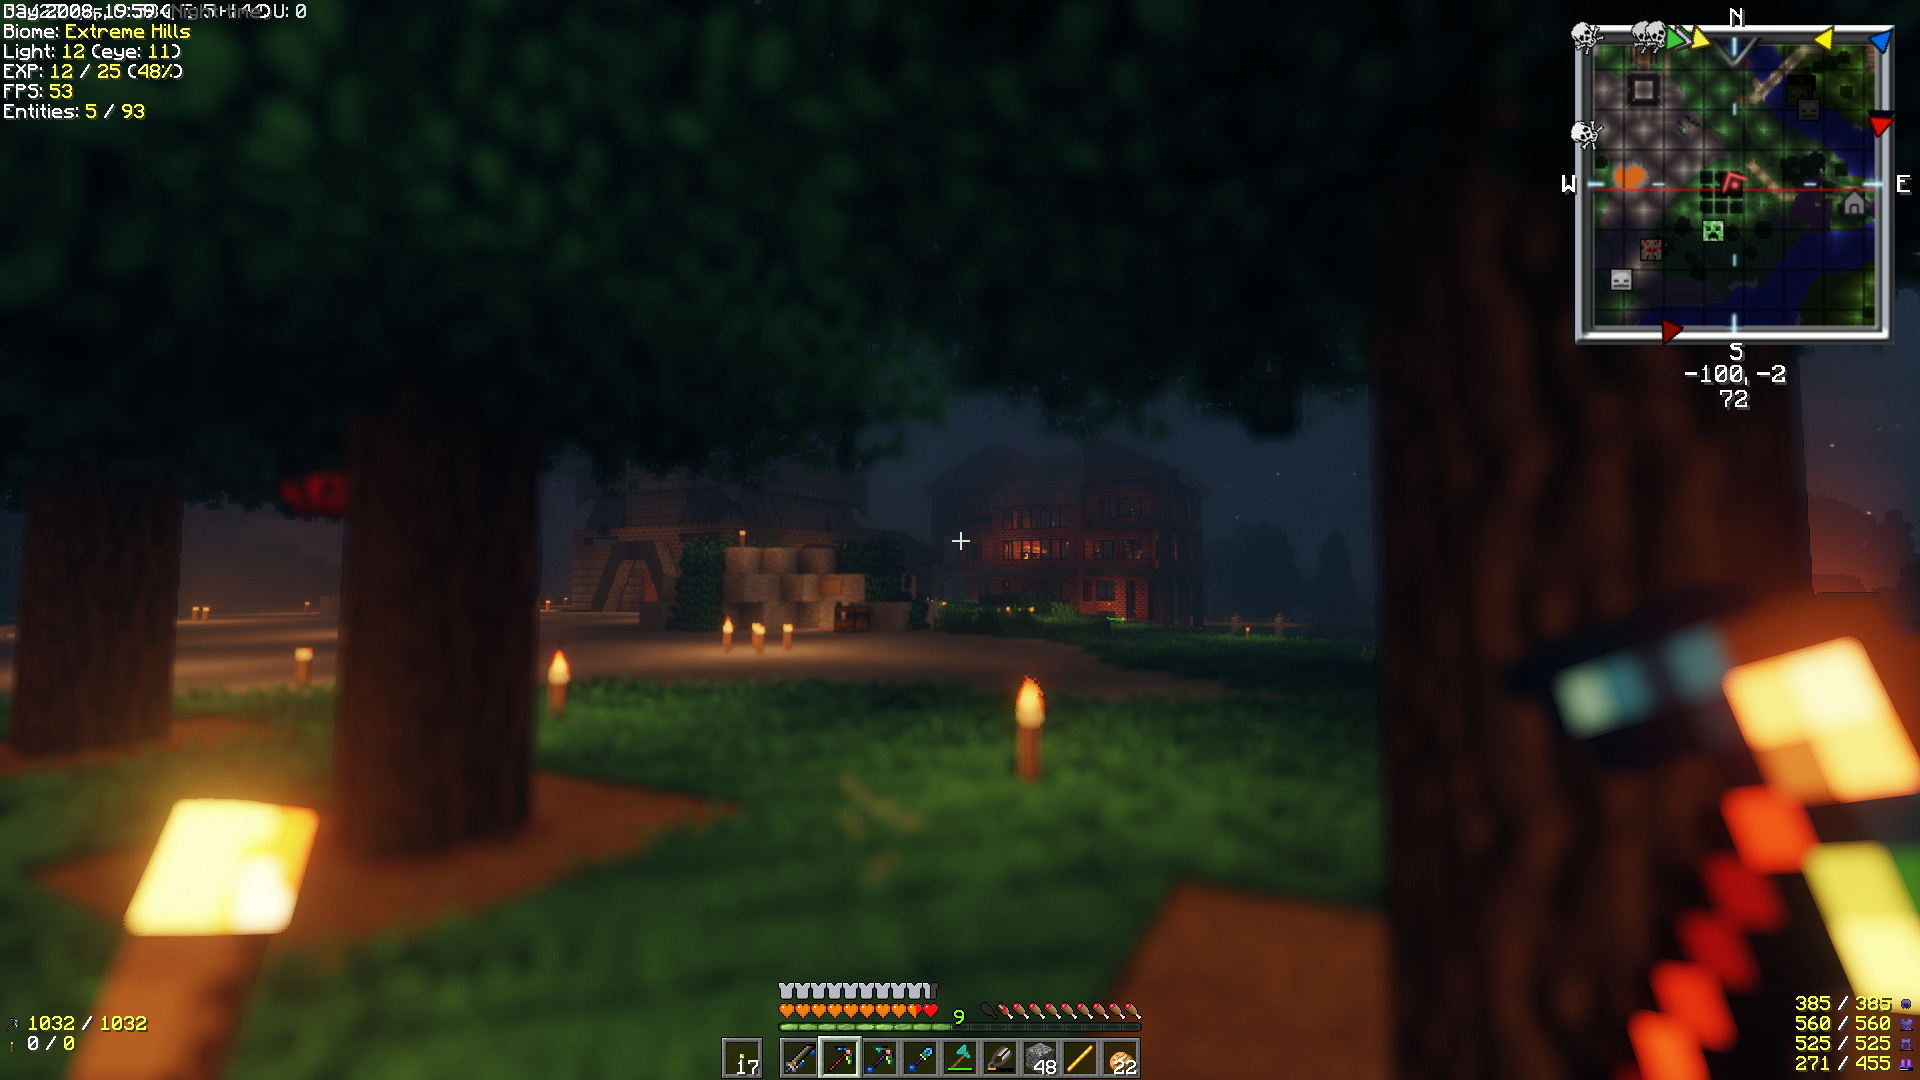
A future version of this page may include a screenshot labelling which mods are responsible for the various bits cluttering up the screen, eg. InGameInfoXML, WAILA, VoxelMap, Journeymap, etc. For now, this is left as an exercise for the reader. 😛
Connecting to a server
You could use the modpack to play single-player, but that's not as much fun as playing with your friends. Plus the game will run slightly faster. Click the Add Server button and add the serveraddress:port value for the first server in the following list that Michael has hopefully kept up to date.
Server list
There usually is only one server in active use at a time (the average is probably a bit under 1, but anyway). Servers marked as "test" come with no guarantee that I won't suddenly make random changes to the server or modpack. Servers here are listed most recent first:
Steam Punk 1.19
Server Address: minecraft.deegan.id.au:25565
Map is here.
Mod list is here.
Discord link TBA.
Live since Apr 2024.
Farming Valley 1.10
Server Address: minecraft.deegan.id.au
Map is here.
Mod list is here.
Discord link TBA.
Live Dec 2022 - May 2023.
MC Cheshpack 1.16 (offline)
Server Address: minecraft.deegan.id.au
Map is here.
Mod list is here.
Discord link TBA.
Live Feb 2021 - Dec 2021.
MC Cheshpack 1.16 TEST (offline)
Server Address: minecraft.deegan.id.au:25575
Map is here.
Mod list is here.
Discord link TBA.
Live Feb 2021 - Jun 2021
WANcraft (offline)
Server Address: minecraft2019.ucc.asn.au:25565
Map unavailable - webserver firewalled 😕.
Discord here.
Live Mar 2020 - whenever in 2022 that UCC lost its direct internet access.
polytopia19 (offline)
Server Address: minecraft.deegan.id.au:25565
Map here.
Live Sep 2019 - Mar 2020
Bugs
Every non-trivial piece of software contains bugs. Modded minecraft is essentially a collection of a large number of non-trivial pieces of software, so you should expect to encounter bugs. Let Michael know if you encounter issues. He will likely arrange the necessary workarounds (where available), and poke at github issue trackers.
Notes for specific known bugs with specific modpacks will appear here.
- Gravestone: does not preserve contents of inventory slots provided by curios. Items (such as amulets, etc) will be placed in your regular inventory instead. Unless your inventory is full, in which case it'll end up on the ground...
- Opening a Mekanism Digital Miner UI while an activated Lantern Of Paranoia is in your inventory may crash the server.
- Using a turtle to lay RS cables also appears to result in bad things happening (server crash).
IAQ List
This would be a FAQ list if any of the questions were asked more than once.
Sometimes the lighting of some blocks is weird

Unfortunately the only sure option is to stop using Optifine (disable "Fancy Graphics") and enable experimentalForgeLightPipelineEnabled in config/forge-client.toml.
How do I make my graphics as fancy as possible?
These settings are merely a recommendation. You are encouraged to experiment to see what the effect (if any) of the many and varied settings are. These settings are listed in the order in which you're likely to encounter them in the game (rather than listing the important ones first). This list is a work in progress.
- Enable "Fancy Graphics" in the launcher. (essential)
- Options; Video Settings; Render Distance: 16? 24? This has a large effect on performance. (important)
- Options; Video Settings; Smooth Lighting Maximum (optional)
- Options; Video Settings; GUI scale: I don't understand why anyone would use a value other than 2/Normal (optional)
- Options; Video Settings; Dynamic Lights: I guess enable this if you want to significantly reduce torch usage? (optional)
- Options; Video Settings; Shaders; Pick a nice shader. BSL and SEUS are good. (essential)
- Options; Video Settings; Shaders; Shader Options (BSL); Lighting; Sun Path Rotation: 40 (recommended)
- Options; Video Settings; Shaders; Shader Options (BSL); Material; Advanced Materials: ON (important)
- Options; Video Settings; Shaders; Shader Options (BSL); Atmospherics; Aurora: ON (recommended)
- Options; Video Settings; Shaders; Shader Options (BSL); Atmospherics; Round Sun & Moon: ON (recommended)
- Options; Video Settings; Shaders; Shader Options (BSL); Water; Water Mode: Flat Vanilla (recommended)
- Options; Video Settings; Shaders; Shader Options (BSL); Post Effects; Depth of Field: ON (recommended)
- Options; Video Settings; Shaders; Shader Options (BSL); Post Effects; Motion Blur: ON (recommended)
- Options; Video Settings; Quality Settings; Better Grass: Fancy (recommended)
- Options; Video Settings; Quality Settings; Better Snow: ON (recommended)
- Options; Video Settings; Detail Settings; Clouds: OFF (if using a shader that draws its own clouds) (important)
- Options; Video Settings; Detail Settings; Sun & Moon: OFF (if using a shader that draws its own) (recommended)
- Options; Video Settings; Performance; Render Regions: ON (suggested)
- Options; Controls; Mouse Settings; Invert Mouse: ON (essential 😛)
- Options; Controls; Auto-jump: OFF (optional)
- Options; Controls; everything else: adjust to taste.
- Options; Resource Packs: add, in this order (last selected is highest priority): faithful x32, round trees, faithfulPBR, patrix basic, patrix addon, patric models, polytopia (important)
- RPG-Hud (where available); um, tweak to taste. (recommended)
Mission Statement
(borrowed from a previous server Michael administered)
- To be a friendly, co-operative, and inclusive community of mature players, who behave excellently to each other.
- To enjoy Minecraft by building complex machinery and creative architecture.
Rules for Behaviour
(also cribbed from a previous server)
- We expect all players to be excellent to each other.
- We expect you to be friendly, co-operative, and inclusive.
- You should bring your community spirit and work with other people, not against other people.
- We have zero tolerance for abuse against people, or destruction of the things they have created in-game. We ban on the first offence; there is no appeals process.